Showing posts with label quilting. Show all posts

Monday, 24 April 2017

My First Quilt Finish of the Year!


Simple baby quilts are just the best!!

This one was a request from friends of friends. It is made up of sixty four 5" finished squares of organic cotton prints taken from my stash. Oddments left over from previous projects.


I was careful to arrange them so they faced all different directions.
I love those animals!


The backing is not organic, but it picks out the orange and deep turquoise colours quite nicely I think.


I debated how to quilt it for quite a while. I wanted something modern, and I didn't want to quilt too heavily. I wanted it to stay nice and soft and drapey. In the end I settled on a chevron pattern with 1" spacing.


I made 2 bibs and 2 burp cloths to match. Again made with organic cotton. The towelling backing is a mixture of bamboo and organic cotton, which I have used before and I know dries quickly. Need to keep these items practical as well as decorative!

I have a lot of projects on the go at the moment, but they're all long term, slow sewing things. It was nice to have a quick finish!

Tuesday, 25 August 2015

Farm Girl Vintage Quilt - Aiming for Accuracy


Today I'm talking a bit about my progress with the Farm Girl Vintage Quilt. The quilt is from this book by Lori Holt.


There is a quilt-along in progress which Lori hosts from her blog A Bee in my Bonnet
We are working systematically through the book making 2 blocks a week, either the 12" size or the 6" according to your preference. The Instagram hashtags are #farmgirlfridays and #farmgirlvintage.

I chose to join the quilt along and make the 6" blocks for one reason. I have until now been really bad at accuracy when working on a small scale like this! I wasn't sure at the start that it was my kind of quilt. I joined purely to improve my skills. It's worked and I just love the quilt now! A few years ago I started the Farmers Wife Sampler Quilt from the book by Laurie Aaron Hird. I made a few blocks, was disappointed by my lack of accuracy and they now sit languishing in a cupboard. I'm getting lots of practice at small scale at the moment. I'm also making the My Small World quilt by Jen Kingwell and I'm going to join the 1930s Farmers Wife QAL posted by VeryKerryBerry (and hopefully finish my original Farmers Wife quilt at the same time!)


Some of the pieces in these blocks are really small. And I mean REALLY SMALL! 
You cut plenty of 1" squares.

So what have I done to improve my accuracy? 
Here are a few of the things that have worked for me:

1. Starch your fabrics before you begin.
You need to starch everything. If some fabrics are starched and others are not you will get in a mess. 
Also make sure you starch before you cut. Some fabrics shrink a little when starched. I cut a strip of fabric 1/4" wider than I need for the largest piece in the block and starch it. Leave a while to impregnate and then press it dry. You will be using the fabrics in other blocks so I just store the unused starched pieces in a box ready to use later.
For now I use regular spray starch from the supermarket. I don't really like using aerosols and I'm not prepared to pay the price for Best Press so I've been experimenting with making my own from cornflour, but the recipe still needs a little work. 

2. Shorten the stitch length on your sewing machine slightly.
Just a little makes a big difference. The normal setting I use on my Bernina is 2.4. For 6" detailed blocks I reduce it to 2.0, for easier ones I just go down to 2.2.

3. Use leaders and enders
These are small scraps of fabric that you sew before you start sewing the block seam and then again when you've finished. It means you never start a seam with the two ends of the thread dangling free. You don't risk the possibility of the machine "chewing" the first couple of stitches, which in turn will distort the block.
I have a box of 1 1/2" scrap squares beside me and randomly sew 2 together at the start and whenever I would normally cut the thread. 


I remember the sewing room at school always had the machines ready threaded with a piece of muslin under each foot with a few stitches sewn. I always wondered why! Now my machine always has one too. The sewn pieces will eventually become a postage stamp quilt for charity.

4. Check you are sewing exactly 1/4" seam
I know this sounds obvious, but it needs to be EXACT. ALL the time.
I really struggled with this for a long time.
My 1/4" was precise enough for large scale blocks, but not for these (and the dreaded Farmers Wife Sampler!) The normal methods of placing marker tape on the machine bed etc. just didn't work well enough for me. In the end I drew the 1/4" line on the blocks with a pencil, until I could recognise exactly where it was. I only needed to do it for a few blocks. I trained myself not to look too much at the pencil line, but at the foot and it worked!

5. Press your seams open.
This is something I had started doing for a while on all my quilts and it really helps on these blocks, where there are a lot of intersecting seams.
I gently finger press whenever possible. Press is the key word. Don't rub your fingers back and forth. Once the block progresses and seams intersect I use a dry iron, minimally, saving a good press until the block is complete.

6. Pin mindfully
I used to pin too much. I used to pin through the seams to make them match up. I think those pins did as much harm as they did good. They often distorted the seam line.
If no seams need matching I no longer pin on seams as short as these.
Where seams need matching I use this approach. Push a pin vertically into the seams of the 2 layers, checking back and front that they are perfectly aligned. Hold that pin vertical from top to bottom.
Place a second pin to the left just outside the seam allowance, so it is going through just 2 layers (the fewer layers it goes through the less distortion). Place a third pin to the right, just outside the seam allowance.


Remove the upright pin before placing the seam under your machine.
Its also worth investing in some good quality pins that aren't too heavy for the job on hand.

7. Trim up as you go.
Lori tells you at every stage what size the finished segment should be. Measure as you go and trim off even the tiniest bit that might be wonky.


8. Unpick a puckered seam
Now, I might be the only idiot who, when noticing a little pucker used to say, "Oh it'll press out at the end"
Trust me, it won't! If there's a pucker halfway through, it'll still be there at the end, and there will probably be a lot more problems along the way! That's what the unpicker tool is for right?!

These few techniques have really improved the accuracy of my work. It's still not perfect but I'm happy with it.
I post photos regularly on Instagram (link at the top of the right hand side bar), and often have fun styling them according to the block title.
Here are a few of my favourites.

Peas and Carrots 
Pie Cherries
Autumn Star and Baby Chick

Chicken Foot and Canning Season


Butter Churn and Baking Day

I hope these tips help anyone who is also struggling with accuracy when working small scale.
I'm looking forward to showing you my progress on the My Small World quilt soon!

And now it's definitely time to put the kettle on!

Kettle's On!


Wednesday, 1 April 2015

A Quilt Finish!


It's a finish! My Hazel Hedgehog quilt for Siblings Together is finally all done. I'm kind of sad, it was such fun to make, and got such a lot of lovely comments here on my blog and on Instagram. But now I can send this, along with the other two I have, off to Siblings Together to be handed out at their summer camps, and I can move on to all the other hundred and one things in my head!
There was no chance of an outdoor photo. We've had gale force wind and a hail storm yesterday! but I think you can see it OK on this bed.


I quilted it with wavy lines from top to bottom....nice and easy and no ends to sew in.


Fortunately I had just enough of some of the fabric scraps left over from the hedgehogs to make a scrappy binding. The backing fabric is Lime Twist Harlequin by Makower which I bought at a recent visit to the Sewing for Pleasure and Hobbycrafts Show at the NEC Birmimgham. Its such a lovely fabric and very useful for backings. I wish I had bought more of it.

I also have another finish to share this week (Two in one week must be a record for me!)
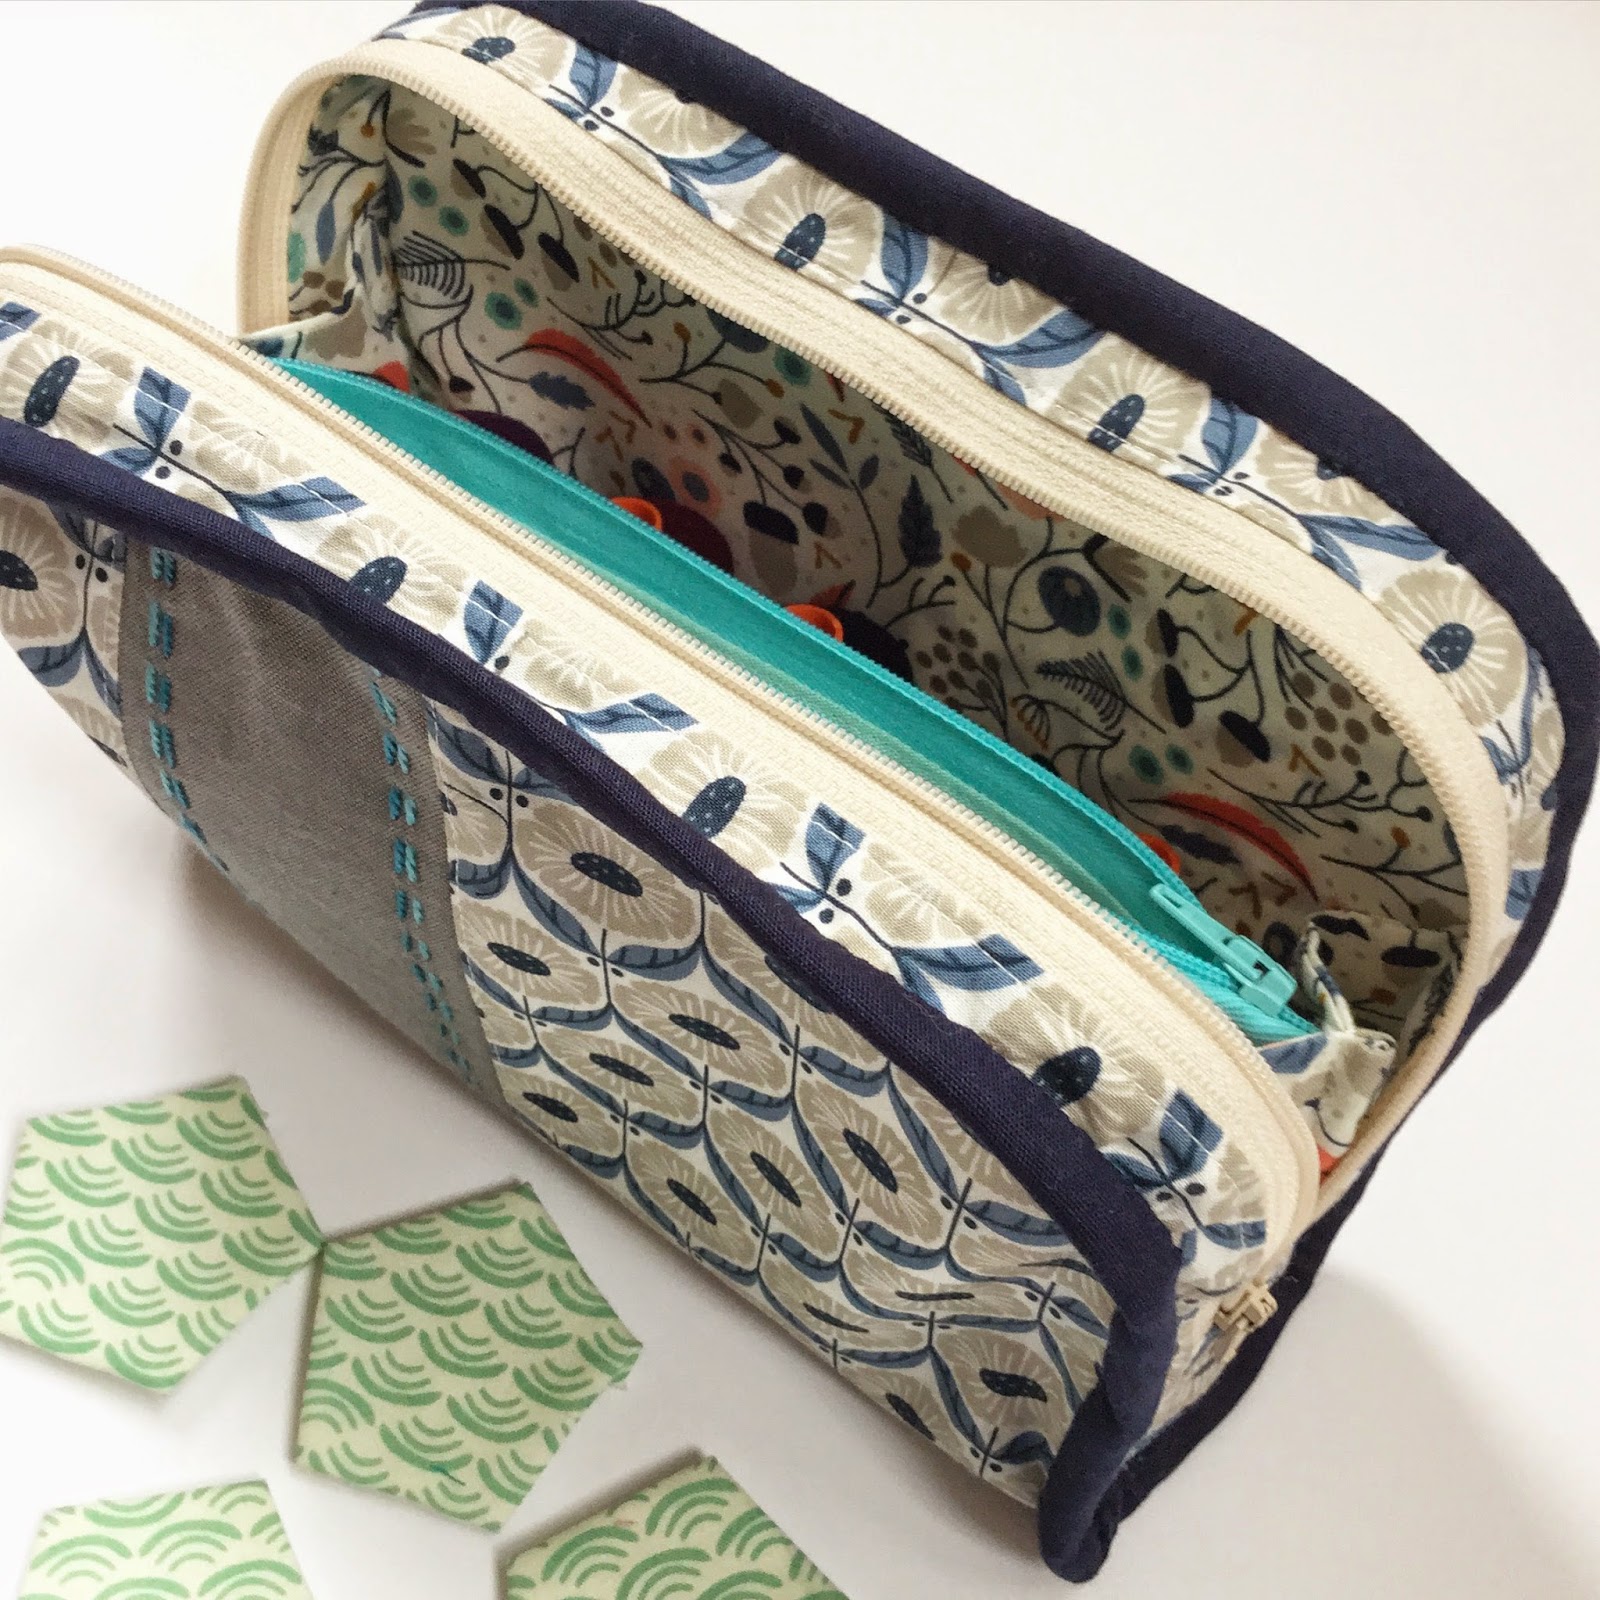
Its this "Little Zippy Pouch" from Quilt Now magazine volume 9.
Sonia from fabricandflowersuk kindly hosted a Sew Along for this pouch on Instagram, which was great fun to follow. Its the perfect size for all my paper piecing paraphernalia, so was put to good use right away.

I used only organic fabrics. The patterned fabrics are Wildwood by Cloud9 and the solids are Cirrus solids again by Cloud9

Linking up with Work In Progress Wednesday and Lets Bee Social

Wishing everyone a Happy Easter

Julie

Wednesday, 25 March 2015

A Prickle of Hedgehogs


When my kids were little we used to play a game whilst they were in the bath. I would quiz them on the name of animal young and collective nouns. It must have stuck in the memory of my youngest as he bought me a print for my birthday last year with many animal collective nouns on it.
When I started making this quilt for Siblings Together, I looked to see what the collective noun for hedgehogs was, and it said a prickle!! Now, I didn't really believe this so I checked it out, and as far as I can see it's true. There is an alternative, which is an array, but I'm going to stick with a prickle. It makes me smile!
So my prickle of hedgehogs is complete. There are 12 of them and I had enough scraps of the fabric left to make a co-ordinating border. I think it adds a nice finishing touch. 


I pin basted it yesterday.


Those poor little hedgehogs. I felt bad putting pins into their faces!
So now it's the quilting. I'm torn between haphazard elongated wavy lines running from top to bottom and a tight zig zag line using one of the decorative stitches on my machine. The second option would be a lot slower, but its the one I'm leaning towards. I'm hoping to test them both out in the next day or so before I finally decide.
The pattern is by Elizabeth Hartman and you can buy it here

We are hoping to get 100 quilts for Siblings Together before the summer camps start this year so that they can be given out to the children as a reminder of their time spent with their siblings. As you can see from the "Quiltometer" in my side bar we are a quarter of the way there! 
If you would like to know more about the charity or to help in any way, please take a look at this post by Mary Emmens


Thursday, 5 March 2015

Mother's Day Mug Rug


Today I'm happy to say that I'm a guest blogger over on the Simply Solids Blog
When Justine asked me to make something for the beginning of March, I realised that it was only a couple of week"s away from Mother's day, so a gift for a Mum seemed to be the obvious choice.
I love making Mug Rugs. They're bigger and therefore more useful than a simple coaster, but not so big that you only bring them out of special occasions. They're the perfect size for a cake and a cuppa!
The background is a simple 2x3 grid of low volume fabrics. I've provided full scale pattern pieces, ready reversed which you can trace onto iron-on adhesive  (I used Bondaweb) 


Cut them out


Trace the wording ready to embroider


Iron them onto the background


Sew around with a zig zag stitch and add a little embroidery.


And finish as you would a normal quilt.
I went a little over the top with the quilting...straight lines, just over a 1/4" apart! Yes, I was having fun. There were of course a lot of ends to sew in, but with a Clover Easy Thread needle where you just pull the thread in at the top rather than having to thread it, the job wasn't too bad.


Of course you don't have to embroider the word "Mum" you could  make one for a friend., or even for yourself! You can trace any name onto the mug band. Just make sure there's a nice edible treat to go with it!


Do pop over to Simply Solids Blog for full details of how to make it. You can also download the instructions  with full size pattern pieces as a printable PDF HERE

Tuesday, 17 February 2015

Siblings Together Quilt - A Finish!


Siblings Together is a charity which works to keep children  who have been separated by the care system in contact with their siblings by arranging, among other things, residential camps where the siblings can meet up and enjoy precious quality time together 

I belong to a quilting Bee which makes quilts that are handed to the children at the end of their camp as a reminder of their time spent with their sibling. January was my month and I chose these simple blocks to make a bright quilt that would suit either gender.
Over the past few weeks I've been sewing all the donated blocks together and quilting it.
Yesterday I finished it. Yay! I'm really pleased with the outcome.
I like to use Quilting Bees or charity quilts in general as a chance to try something new, so I chose a new (to me) quilting design. I quilted an offset diamond and then echoed around it at about 1" spacing using my walking foot. If I was doing this again I would use narrower spacing to make the diamond more prominent, but at least it was quick to do.
I have another quilt that I'm in the process of finishing, hopefully in time to be sent off along with this one.
The Siblings Together charity are hoping to be able to donate 100 quilts at this year's summer camps. I have a "Quiltometer" in the side bar of my blog, and as you can see, we still have a long way to go!
If anyone reading this would like to help, we would be enormously grateful.
You could help by:
:
  •  Donating a quilt
  • Donating one or two blocks to a group quilt
  • Offering to put together a group quilt 
  • Donating some unwanted fabric for someone else to make a quilt if you have fabric but not time
  • Offering to make a quilt with donated fabric
  • Donating fabric for backing or wadding.
  • Spreading the word on social media or to quilting friends or guilds.
  • Any other way you can think of.


If you think you might be interested, Maria who blogs at Sew Love To Sew has written a lovely blog post giving more details about the charity and how to get involved.
It would be lovely if we could meet this target and we would love for as many people as possible to get involved!


Pin It


Tuesday, 24 June 2014

The Big Reveal


What an exciting weekend I had !
Just over a year ago Maria invited me to join a quilting bee.
We each made one strip of a quilt and then posted it onto the next person, who added a strip and so on until everyone had contributed to every quilt.
We agreed to not post photos of the quilt as it progressed, but instead we sent a journal along with the quilt and everyone wrote about the blocks they added and included photos of the progress in the journal.
We decided it would be a lovely idea to all meet up to give the completed quilt tops back to their owners and Jen very kindly offered to host it for us.
We were blessed with a wonderful sunny day and were able to take our quilts into her garden for the Big Reveal.

This is Sarah opening hers.

Next it was Amy's turn.

Then me !! I think you can tell by the ear to ear grin on my face just how pleased I was with this!
I started it off with the  third row down. Just look at all the different blocks the others added. There are cotton spools, baskets, pinwheels, 16 patches and stars. Some people even used organic cotton as they know I like it so much !
Thank you dear friends !!


Jen our wonderful host, had said in her journal that she liked pink and purple, so we took her at her word and made the brightest quilt imaginable. I think she likes it, don't you?


Maria our Queen Bee was next up. I love her quilt so much. She started it off with the row of houses and I'm definitely going to be making some houses since seeing them. I made the birds on the top row. I actually blogged about them here. I just didn't let on what they were for!


Finally it was the turn of Fran. I don't know how she managed to wait her turn!!


So, six wonderful quilts filled Jen's washing line and we all clicked away excitedly with our cameras.


I am so grateful to Maria for inviting me to join this Bee. It was wonderful to finally meet everyone, and so kind of Jen to host it for us. We had so much to talk about and the time passed so quickly, but at least now, whenever I look at my quilt, I can remember the people I met and our day together.

We sometimes have a tendency to over concentrate on the design, or the fabric choice or the skill when making a quilt, but really they are the sum of their parts and much, much more. They are the thought and kindness that went into making them. They are the comfort and pleasure they give to their recipient. They are a little piece of history.
My quilt and it's  journal will be certainly be treasured, along with the friends I've made along the way.

PS I hope my Bee friends are OK with me posting these photos of you. If not, just let me know and I'll take them down :-)

Thursday, 19 June 2014

My Life in Lists


Life is fun filled and action packed at the moment and I have a lot of very enjoyable projects that I'm mid-way through, or committed to in the near future. Trying to prioritise which to do when could be quite a headache, but I want to enjoy all these projects so I resort to writing myself lists.


I have lists for the garden jobs, lists for the household chores and a lovely long list for the crafting projects.
Love them or hate them, lists certainly do keep you focussed and I love being able to cross off an item or two at the end of the day (or week!)
I'm quilting a king size quilt for a friend at the moment. It's a lot of work. To make sure I don't fall out of love with this I need to quilt it in small doses, so it stays on the list, and I just do a little a day.


I've also been working on a new knitting pattern, but just for the time being I need to put this on the back burner whilst I get more pressing things done. It stays on the list though, so it doesn't get forgotten. It's a good thing to do when I sit down in the evening.


The charity sewing isn't needed until October, so nothing to show yet, but it's on the list so that I start to plan in my head what I'm going to make.

The most urgent projects on the list are the ones for my son and his fiancee's wedding, which is in August. Aah! just a matter of weeks away!
I have hessian table runners with lace trim to make. No pictures to share yet, I'm afraid.
I also have six lengths of wedding bunting to make.
Laura has chosen the fabrics from my copious stash - well, why go shopping when your soon-to-be mother-in-law has a whole room full of fabric!
I've got as far as cutting out the pennants and ordering the bias tape. I've had to buy it  by the roll!!


She's chosen some gorgeous prints and this is going to be the most fun project ever.

I also have to help her make a dress for her honeymoon (Oops! forgot to put that on the list!)


It's going to be very pretty and it will suit her so well, but this is not, in my opinion, a beginner pattern as it says on the front. We've had to do quite a lot of alteration and I've ended up completely re-drafting the armhole.
Just in case you couldn't guess, my favourite project on the list is the bunting!


Pin It

LinkWithin

Related Posts Plugin for WordPress, Blogger...