Thursday 3 November 2016

BC Garn Semilla Organic Yarn

Pin It
I have finished this cowl neck cardigan for my little grandson.
This was my first foray into designing larger baby items.


And choosing to start with a cowl neck was probably not the most sensible decision!
But it's done and I'm very happy with it.

I would like to be able to say the pattern will be available soon, but that day is still a long way off. Designing one size was hard enough. Grading it for more sizes just isn't top of my "to do" list right now.

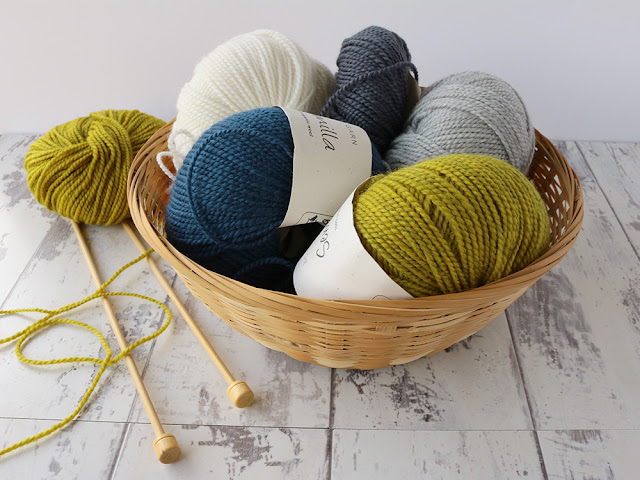
But what I have discovered is that BC Garn Semilla organic wool is a total dream to work with.
So much so that my stash of it is growing!


This is my DK weight collection. I have quite a bit of that lovely moss green left over and it goes very nicely with the greys and navy. I have plans for knitting some mittens and baby leggings with this.

Although this is a double knit weight yarn, I've found that if I use 3.5 mm needles I get a sports weight tension and the resulting fabric is still nice and drapey. 
So I think my collection of this will be growing over the next few months!

Although this is a hand wash only yarn, this is not a problem for my family.
My son and daughter-in-law have tried to dress their little one in predominantly organic clothing, particularly if it is next to his skin.
With careful planning and buying only basic items that all go well together they have been very successful in this aim.
They are quite happy to trade a bit of hand washing for the knowledge that the items are made of natural organic fibres.

DC Garn also produce a 4 ply and a chunky weight organic yarn.


I chose this combination of 4 ply. I'm thinking it will make a lightweight cabled sweater, predominantly grey with a red trim around the neck and cuffs.
I don't think I'll be casting on just yet though. The mittens and baby leggings are more urgently needed!

BC Garn organic yarn can be bought from LoveKnitting and with 35 shades to choose from, I'm not going to run out of ideas any time soon!


Saturday 29 October 2016

It's Been Way Too Long

Pin It
What can I say? I guess if you have followed this blog in the past you will have thought I had given up on it. I wouldn't blame you.
Truth be told, I have been on a 6 month photography course that I have poured my heart and soul into. And it's just finished!

The course was recommended to me by my daughter-in-law. She had heard of it through her own online market place communities and had heard extremely good reports. 
It's not just any old photography course. Its specifically a product photography course for designers and makers.
100 lessons that you can work through at your own pace over 6 months. 
Well as someone who had bought a DSLR camera in order to photograph products but hardly knew which way was up, my pace was very slow!

The course is run by the most patient teacher ever, Lyndsey James.


You can find it here

We covered a lot more than just photography skills. We looked at defining our customer, product styling, using props, and creating sets.
On more than one occasion my neighbour came over intrigued as to why I was sawing and painting wood in the garage. And probably even more intrigued when I told him!!

Lyndsey is a natural teacher. She encouraged when needed, found different ways to explain things if we didn't understand and was always there for us in the online forum, no matter how busy she was with other students.


We learned to tell stories with our photos.


To get ourselves in the shot without anyone as an assistant.


How to master creative blur.


Cosy festive shots and a whole lot more.

Now all those ideas spinning around in my head can begin to become a reality. I can hopefully get the shots to do them justice.

I have learned so much, but I'm fully aware that I'm only at the start of the journey. A lot of the photos in my patterns, both knitting patterns and quilting ones, now need re-doing.
That will be a mammoth job!

So, you can expect to see me back here much more regularly. I already have a new knitting pattern and tutorials that are almost finished.
The quilt patterns will come next. I'm prioritising knitting at the moment. Firstly because its the right time of year to cosy up with needles in hand and secondly because its also the right time of year to get photographs of my grandson modelling my creations!

Quilting may be on hold for the moment, but its only temporary, I promise!.


Friday 22 July 2016

Portholes Log Cabin Blanket - a new pattern


Ta Daa!! I have designed a new blanket pattern!
This has been soooo long in the designing stage and quite a while in the making stage too! Although once I actually knuckled down and worked on it properly, it only took about a week to make - and that includes all the fastidious note taking, note checking, weighing of yarn, doing the maths and checking the maths........all the little things that if you forget to do whilst making the sample, you end up making another sample!!


Pin It
This really is a very simple blanket to knit. It is worked entirely in garter stitch and the blocks or squares are modular, which means you join sections as you go. This does mean you have to pick up stitches, which I know some people don't like doing, but its pretty straightforward and by the end of a few squares you'll be an expert!


I thought about calling this post "When Knitting Met Quilting" as the quilters amongst you will know that this is a variation on a traditional log cabin block.


I have given instructions and yarn amounts for 3 sizes in the pattern:
Baby size: 32" x 32" (81 x 81 cm)
Throw size: 60" x 46" (152 x 117 cm)
Bed size: 74" x 60" (188 x 152 cm)

Its really easy to make it any size you want though!


I originally hadn't intended to give it a border, but I'm so pleased I did! It really frames the design so nicely.

I picked 12 colours of Stylecraft Special DK for my version (11 colours and a white for the background) - a deliberately chosen colour palette.
The shade numbers are all listed in the pattern if you want to replicate it.
When knitting the squares though, I just randomly picked colours from those 11, being mindful to try and not overload on my favourites!
If you were knitting this entirely scrappy, I think a mixture of neutral low volume shades for the background would look awesome!

If you start the plan the colours though, a whole new design appears!
If every square is knit to the same colour plan then you get a pinwheel effect.


Or maybe try knitting 2 adjacent sections the same colour:


Or having a dark background:


Maybe knit all the sections in one square the same colour. I love pastels!


If you're feeling like starting a longer project the throw size might be for you.


Or maybe, just maybe you're so adventurous you want to start a bed size version!


You know, in my head I want to knit ALL these versions! And my family would say I have enough of a yarn stash to do so!! But maybe I'll start with a pastel colour blocked version.....its kinda my favourite right now.
You can find the pattern for sale on: Ravelry    Etsy  or  Craftsy
Make sure you post a photo of you blanket progress on Instagram or Facebook and use the hashtag #lovefibrespattern I love to see what you're making !

Sunday 26 June 2016

Blue Sky Alpacas Skinny Cotton - A Review


A few years ago I became very interested in trying to use organic cotton whenever I could. At the time there were several yarn companies producing a fairly impressive range of organic cotton yarns, but very few fabric companies had taken the plunge at that time and their range of designs was very limited. 
Over the last few years the tide seems to have changed completely. You can now easily buy organic cotton fabric in a wide range of types and a mulitide of designs, but several of the yarn manufacturers that initially started an organic line have discontinued them. 
To the best of my knowledge Debbie Bliss Eco Baby is the only one remaining from those early days.
I can't even begin to guess at the reasons for this, but it has meant that whilst my stash of organic cotton yardage continues to grow and be used, my yarn organic yarn stash is now almost totally used up.
So a few months ago I tried really hard to find some new organic cotton yarn supplies. 

I purchased a few and today I shall review the first one that I found - Blue Sky Alpacas Skinny Cotton
Knit on 3.75mm needles I achieved a double knit tension of 22sts to a 4" square 
It comes as a 65 gram skein and is hand wash only. 
At £12.25 a skein it is definitely a luxury yarn.
There are 22 colours to choose from, and the shades are modern.
I chose to use Squash (shade no. 306)

Both the cost and the hand wash criteria made me hesitate for a while, but I'm glad I took the plunge and tested this yarn.


I can honestly say is a dream to knit with - and I don't think I've ever said that about a yarn before! It is so, so soft and did not make my hands ache, which some cotton yarns do. It did not split at all, gave brilliant stitch definition, and held it's shape well

I think that the hand wash only factor would be a deterrent for some knitters if they wanted to use this yarn for baby items. Babies are prone to a lot of unpredictable spewing, after all!
In my experience, however, mothers who want to avoid traditionally grown cotton close to their baby's skin are quite prepared to trade a little hand washing for the knowledge that their baby is not being exposed to unnecessary chemicals.


The pattern is Sirdar 1238 from the booklet Cosy Little Knits.
The model in the top photo is my grandson!

Would I use this yarn again?  Yes! Most definitely - provided I knew the recipient appreciated organic cotton and was prepared to hand wash their garment.
SaveSave

Friday 20 May 2016

New Website


I've been busy over the last couple of weeks, but in a tech way, rather than a creative way.
I now have a website specifically for my knitting patterns and pattern related tutorials.

You can find it here    www.lovefibres.com

It still needs a lot of tweeking and the banner is only temporary until I can make a better one, but it serves the purpose I wanted it for - to have all my patterns in one place, both the freebies and the paid for ones. The tutorials will be added gradually. I'm hoping they will become a sort of reference library where you can check out any techniques used in my patterns. I know some people like to have the tutorial right on the page in the pattern, but other customers find this makes the pattern unnecessarily long, so hopefully this will be a good compromise.
If you have any suggestions as to what to include in the tutorials, please let me know. 

At present the photos of the patterns link to my Etsy website, but I could easily change the links to other platforms that I sell on if I wanted or needed to.

After wrestling with all that technology, I'm really looking forward to a bit of time relaxing with my knitting!


Tuesday 19 April 2016

Tiny Knitted Bunting - a Free Pattern


 I am taking part in the 100 Day Challenge over on my LoveFibres Instagram page. I have challenged myself to knit something very small, or part of something very small every day for 100 days.

I shall have to cheat a little on this as today is Day 1 and it goes right on up to 27th July. I shall be on holiday and have family staying before it ends so I intend to stockpile my progress reports so I can post them in groups when I can't commit to a daily routine.
My necessity these have to be very small items. Im thinking tiny toys, finger puppets, egg cup cozy etc (if you have any ideas, let me know!). I shall probably also knit some squares for a little blanket.
For today which was Day 1 I started on a high and knit some tiny bunting. I have put the instructions in a PDF which you can download from Dropbox HERE


The pennants are about 2" wide,  2.5" deep and take just 4 metres of yarn each.
I think the best thing about them is that they have eyelets at the top and are threaded onto bakers twine. This way, if you want a different size bunting, or a different colour combination, then you just re-thread them to suit the new location.

The next 99 days will not be so adventurous, but if you want to follow my progress, it's on my @LoveFibres Instagram page.


Pin It

Monday 28 March 2016

Some Liberty Scrap Busting


Pin It
Hello! I hope you've had a very happy Easter break.
Despite the wet and windy weather, I spent as much time as I could digging my new allotment. I've only just taken it on and its thrown all my plans haywire. I didn't expect to reach the top of the waiting list this year, and when I got it,  it was in a serious state of neglect!
It's probably a good thing that it rained as much as it did. Otherwise I would be incredibly sore from digging by now.
When I wasn't busy digging I was having a really rather lovely play with some Liberty fabrics and paper mache shapes in my craft room.
I keep even the tiniest scraps of fabric and they were the perfect choice for these Easter eggs and bunny.
The papier mache shapes were bought from my local Hobbycraft store and I used regular PVA glue to attach the scraps. They were all odd sized pieces, and very small.  I cut down larger fabric scraps to about 1" (2.5cm). Around the top and base of the eggs they were even much smaller than that.


Once completely covered I let the eggs and bunny dry for a while and then checked them over, applying more glue if any little edges had escaped the glue treatment.
The correct name for this type of craft is decoupage.
It was lovely to work so closely with the small squares of Liberty prints, seeing all the tiny details which you sometimes miss when sewing something larger.


I also love how, quite by chance, the rabbit appears to have an eye! He hasn't,  it's just how the pattern  of the fabric falls. But it's quite uncanny that it was totally unplanned and yet happened on both sides of the rabbit!


Of course, this beautiful way of using up those small scraps of fabric isn't just restricted to Easter. You can buy all sorts of different papier mache shapes to cover - hearts, small trinket boxes, initials and a whole host of other animal shapes, both large and small.
I may end up with some Liberty print in every room at this rate!

I hope you had a Happy Easter too!


Sunday 6 March 2016

Quick and Easy Bobble Hat - A Free Pattern


As often happens, this week didn't turn out the way I planned!
I arrived back from a month in Toronto just a week ago. What a wonderful month that was! I was there to visit my new grandson and his very proud mum and dad. Oh dear! I am missing all those baby cuddles right now!
On arriving home I dived into my yarn stash with the idea of knitting something for the baby. I pulled it all out and decided that it definitely needed to be culled and organised.
My son  and his wife follow my beliefs in using natural, organic yarns where possible and in order to buy more yarn, I needed to use up some of the old stuff first.
I decided to use a bag of super chunky weight yarn to make some charity hats.
These are just a few of the ones I've made so far.


I'm going to send them to Knit For Peace. Although it's almost Spring I'm sure they will be welcomed  for refugees.
As usual I made up the pattern to suit my needs. 
I've written up the pattern to share with you. It gives instructions for three sizes:
3 - 6 yrs
6 yrs - teen
Adult
I've given instructions for both knitting in the round and knitting flat. Choose whichever is your preferred method. 
You can get the Dropbox link HERE


I was working on the pattern yesterday over a cup of tea when an interesting conversation with my adult son ensued.
He asked what I was making and I said "A hat with a pompom". He said "Oh, you mean a bobble hat" 
"Yes, I suppose I do" I replied.
So I started to wonder which name I should give to the pattern. Hat with Pompom or Bobble Hat?
In the end I decided that he was probably right, but I would love to know which term you would use. Pleased let me know. I might end up changing it!

So, a week ago I thought I was knitting baby clothes. About 7 charity hats and plenty of pattern writing later, I now have a smaller stash, and yes, I think I can justify a little baby yarn purchase, don't you!


Pin It

Wednesday 17 February 2016

All Snuggled Up


Here is my new grandson, Oscar at 3 1/2 weeks old, all snuggled up in the entrelac baby blanket that I knitted.
Entrelac is a really easy technique that creates a textured diamond pattern. The basketweave effect is actually created by knitting squares facing in opposite directions. Once you've got the base row of triangles sorted, you only work on a few stitches at any one time (in this case, just 10 stitches) and it is nicely repetitive, in a good sort of way, so you don't have to keep referring back to the pattern. It makes an ideal project to knit whilst watching TV.


The pattern is available from Love Knitting as well as my Etsy and Craftsy shops. (links in the sidebar)
Oscar's blanket was knit in an organic double knit cotton, which sadly is no longer available, but if you want to make it using similar colours try Sublime Baby Cashmerino in Pebble, Cuddle, Gooseberry and Vanilla.
You could also go completely scrappy of course, and use up some stash!
Pin It

Sunday 31 January 2016

And Baby Makes Three


I am super excited to say that my first grandchild has arrived!  Oscar David was born last week and I've flown over to meet him. Needless to say I think he's adorable! But then I'm sure every Nana thinks the same when their grandchildren are born.

I've been busy sewing and knitting for him for the last few months, and when I arrived he was dressed entirely in Nana made clothing.


The blanket is organic wool that I bought years ago, and my own design. The hat is organic cotton interlock from The Village Haberdashery. It's one of manyI've made! They are so quick and easy to make.


He also has several pairs of pants from the same fabric. The pattern is from an old Ottobre magazine. I'm so glad I purchased a few of these magazines when I saw them. They are going to be so useful over the next few years.

I knitted him several tops, but omitted to photograph them. Here's one I did take a picture of.


Once again its my own design and is knitted from Debbie Bliss Eco Cotton.

Every baby I knit for always gets a hat knitted from my Logan Pattern, and this one was no exception!


I made all the crib bedding from organic cotton percale sheeting from The Organic Textile Company
and finally I made him a hooded bath towel. 


Towelling is also from The Organic Textile Company

Of course, I have ideas for many more things I want to make him, but right now it's just time for cuddles and to enjoy watching my son and daughter-in-law do a wonderful job of looking after him!


Friday 15 January 2016

10 Minutes a Day in 2016


Hi! and welcome to my first post of 2016.
This is going to be a busy year!
I have such plans for my pattern designs, both knitted and quilted, I'm going to become a grandparent for the first time and I'm going to do a lot of travelling. It's going to be a lot of fun!

Knowing what was ahead, I started to be careful what I committed to towards the end of last year. 
The usual rounds of quilt alongs and swaps needed be declined. It was hard to say no, but its no good agreeing to do something if I don't have the time to see it through.

My little grandson will be born any day now, and I've been busy making organic baby clothes, blankets, fitted crib sheets, all of which I'll show you in another post. I've been to Toronto to help his Mum and Dad get their house ready for his arrival, and I'll go again as soon as he is born.
I've managed to keep up with some of the groups I'm in, but deadlines are hard, especially when you're not even on the right side of the world.

My sewing has to be done as and when it fits into my schedule this year, but I don't want to give up on the things that are important to me, like making quilts for Siblings Together.
Last year I made several for them, including this one.

and this one.

It was whilst I was rushing around trying to complete everything I'm committed to for this month, that I had an idea. Just because I can't commit to deadlines, doesn't mean I can't still make a Siblings Together quilt or two. I just need to make it slowly, on my own, rather than as part of a group where I might let people down.
I looked at my stash of scraps. Its huge!

I keep even the tiniest pieces. I have this box full of odd size little scraps. They are so little they usually get rejected whenever I'm hunting for pieces for a specific quilt bee block.


I have this box full of squares I cut over a year ago in preparation for a postage stamp quilt. Those little pieces are just 1.5" square! The quilt of course never got started!


I have Jelly Rolls that I've never used and lots of blocks that were either experiments or just didn't make the cut when I was making previous quilts.


So my plan is to try to spend just 10 minutes a day, or an hour a week, sewing up the scrappy pieces into a scrappy quilt for Siblings Together. They will be simple blocks that take no thought or preparation - nine patches and string blocks. Anyone can find 10 minutes a day, surely. I'm not putting any pressure on myself. If it doesn't get done, or I'm away, then no worries. But when I can I shall put that 10 minutes to good use. 
A 10 minute coffee break spent chain piecing. Getting up 10 minutes early and cutting up some scraps. Doing 10 minutes sewing before I go to bed. 10 minutes sewing instead of 10 minutes on social media.

Its surprising just how much you can get done in 10 minutes. 
I chain pieced 40 postage stamp pieces into twos yesterday. 
I made them into 20 four patches today!


To keep myself accountable, to spur myself on, and hopefully to encourage someone else to do the same, I'm documenting my progress on Instagram (I'm mackandmabel). I shall be using the hashtags
#10forsiblingstogether and #10minutesaday

I'll share progress on this blog from time to time when there is more to see.
If you have scraps to spare why not join me!


Pin It

LinkWithin

Related Posts Plugin for WordPress, Blogger...