


Welcome to my first Block Buster Sunday, where I explore a new (to me) block. I was so excited to put that #1 in the title. It feels good to be starting something new at the beginning of a new year.
I'm kicking off with something I've had on my bucket list for ages - curved piecing.
I've gone all out with this one, written a tutorial for the technique of curved piecing and played around with the block to give a lot of options, and I've had a load of fun doing it! Don't expect this much every Sunday - this was probably a mix of over excitement at a new blog feature and the fact that I fell in love with the block.
There will be a good mix over the weeks of what I consider to be easy, moderate and challenging blocks, so if this one looks too difficult for you, or you've been there, done that with this one, don't worry, by the law of averages I must eventually come up with something to interest you, right?
I'm using 5" charm squares to make four blocks, which will be 4" finished (4 1/2" unfinished)
You will need:
Two 5" square printed fabrics
Two 5" solid background fabrics
Freezer paper

First you need to make a template for the curve. You can of course purchase ready made ones, but this is how I did it. As my squares were 5", I randomly decided that the quarter circle curve I'm creating would be 4" (you can make it any size you want.
I created an 8" diameter circle (8" diameter will give me four 4" quarter circles)
I drew mine on the computer using Word as it's what I'm most familiar with. You don't have to use the computer, you could draw round an 8" diameter plate or use to a good old fashioned pair of compasses (remember those?)
To use Word, click on New Blank Document, click Insert, click Shape, choose the Oval.
Drag your cursor until the shape is a reasonable size. Right click and choose Format Shape, choose Size and type in 8.00, then to save ink, choose Fill, then Colour and opt for No Fill. Save your document.
(Note: I use a Mac, but I'm sure it's very similar on a PC)
Cut an A4 sheet of freezer paper (or whatever size goes through your printer)
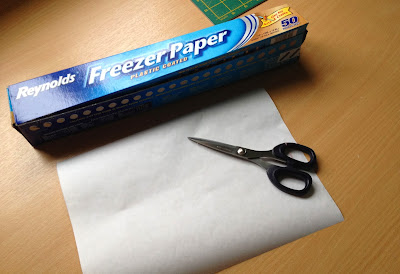
Place the freezer paper sheet in you printer so that it will print on the dull side.
Note: freezer paper goes through my Epsom printer perfectly well as long as I just help it in a little at the start. If you are worried it might chew it up, tape it at one end to a plain sheet of printer paper using sticky back tape or a tiny amount of Blu Tack or other poster adhesive.
Print the circle onto the freezer paper.

Cut out the circle, and fold first in half and then into quarter segments.

Open out and cut along the fold lines to create four 4" quarter circle templates.

Lay the template in one corner of one of the 5" charm squares, ensuring the straight edges are lined up, and press in place with a dry iron.

Repeat for the remaining three 5" squares.


Carefully peel the freezer paper away from the fabric. I found it easier to pull on the fabric, rather than the paper. You can keep the templates and re-use them.

This is what you should have.

You now need to make the concave pieces smaller, and the reason is this:
A 1/4" seam allowance inwards on the convex piece (the bit that looks like a pie segment) is a shorter line than the cut line. A 1/4" seam allowance inwards on the concave piece (the bit that looks like an L shape) is a longer line than the cut line.
Very roughly, there is 1" between the two (yes, I'm truly a geek, I did the maths!!)
So we need to slice 1/2" off either end of the concave piece.


Do this for all four concave pieces and you should have this:

Piecing
Take one concave piece and one convex piece.

Find the centre by folding each piece in half.

Firmly finger press the crease and then open out.

Place the two centres together, right sides together and pin in place. It is helpful to use small pins and only pick up a small amount of fabric.

Next pin the edges. Make sure the straight edges of the two pieces are parallel with one another and pin the straight edges too. They have a tendency to twist out and I think that side pin is paramount to success !


Hold the section between the edge and the centre between your fingers and gently manipulate until the two meet evenly. Don't stretch it excessively, just work the two edges between your finger and thumb.This is one time when the bias edge is your friend, not your enemy. Pin again. Do the same for the other side.

Turn the block so that the section with most undulations is upper most. This is so you can check you are not catching any extra fabric in the seam as you sew.

Take the block to your sewing machine and line up with a 1/4" seam allowance.

Sew slowly, using the needle down button, if you have one, so that you can stop and adjust the fabric whenever necessary. Use a pin or tweezers or seam ripper to hold the two edges together between pins.

Ta Daahh!!

The fabric seemed happy to be pressed to either side, so I chose to press towards the print.


Repeat for the other blocks you have cut.

Now comes the really fun part - seeing all the different arrangements that can be made!
1.

2.

3.

4.

I was enjoying this, so I made a few more blocks.
5.

6.

7.

8.

9.

10

And a few more!
11

12

13

14

15

16


I'm sorry this has been such a long post. If you're still reading, then I'm amazed, and thank you! I think I got a bit carried away with my enjoyment at making this block. Despite all I said in my last post, I think I will be making a whole quilt or quilts! with some of these arrangements. Curved piecing is not to be feared. I find it much easier than many multi-piece half square triangles.
My favourites out of the above arrangements are the simpler, bolder ones. I think numbers 1, 5 and 10 are the ones I like best. I can see myself making a quilt all in solids, maybe with a grey background? Mmmn, the imagination is working overtime.
Which is your favourite?
Edited to add a link to a YouTube video showing you how to sew curved seams without pins, kindly suggested to me by Lucy who blogs at Charm About You

Great post! I love dp blocks because there's so many great layouts. I find it easier to sew without pins using my 1/4" foot. Looking forward to seeing your next block too!
ReplyDeleteWow, this is amazing! Always wondered how it was done... Will try and have a go. Love number 5 too!
ReplyDeleteSo interesting, loved reading right to the end, certainely stirred me to try and have a go. Looking forward to your next blog. Loved all of your blocks.
ReplyDeleteWow it's way too difficult for me Julie but I am so impressed by anyone who can do this, it's amazing I can't believe how many ways you can display this block, my favourite is number 15 it's so pretty but then they all are. Well done for such an informative post, can't wait for next week. :)
ReplyDeletegreat post - thanks Julie. I haven't attempted curves yet, but you make it look not too hard!
ReplyDeleteWonderful! I'll be making something with curves shortly, your tutorial is great (and thanks for doing the maths :-) ) Looking forward to next sunday's tutorial :-)
ReplyDeleteWow, this is fabulous Julie. What a coincidence you should post this now as I'm planning to make a cushion soon using these blocks and have been looking for the best method of making them, I think this could be it!
ReplyDeleteThanks so much for sharing your curved piecing tutorial, Julie! I love curved piecing too. Many people are afraid to give it a try, but once you do, it is hard not to become hooked! All your designs are wonderful! It is difficult to choose a favourite arrangement, but I like number 3 the best. Glad to see you are promoting this method!
ReplyDeleteI have yet to try this. Great tutorial and love all the different combinations!
ReplyDeleteGreat tutorial! Can't wait to try it!! Love that you added all the variations. Such a great Idea!
ReplyDeleteWow Julie! Look at all of those variations! I personally like number 1 and 9, but whatever you decide will be great! :) I love trying new things too! I look froward to seeing more! :)
ReplyDeleteI am giving away a fat quarter bundle on my blog today! I would love for you to come over and enter! Happy New Year!
Inspiring Creations Giveaway
Wow! I love all the possibilities!
ReplyDeleteWow - this is great! Drunkard's Path is definitely on my "to-do" list of quilts but I wanted to get more under my belt before I attempt curved piecing.
ReplyDeleteThanks for this - it's so clear!
ReplyDeleteLove these, they look so pretty. My favourites are 13, 16 and 10 :) I spend ages trying different combinations and layouts, it's so fun!
ReplyDeleteJust found this tutorial and thank you!!! Makes perfect sense, and I'd been wanting to use up a few charm packs - Drunkard's Path Blocks had been floating in my head.
ReplyDeleteWhat a great Drunkard's Path tutorial! Thank you for doing the Maths! I'm hoping along to visit the rest of your Block Buster posts!
ReplyDeleteThanks for this tutorial, I used it for my first attempt at a drunkard's path block and it worked like a charm!
ReplyDeleteThanks for sharing this tutorial! I just couldn't wrap my head around how to sew curves, but your step by step instructions made it super clear!
ReplyDeleteMy favorites are 13 and 16! Thank you so much!
ReplyDeleteI storied this .... amazing. Made a quilt turned out great!
ReplyDeleteI storied this .... amazing. Made a quilt turned out great!
ReplyDeleteHi! Thank you for this great tutorial! I love your way to cut and not loose much fabric! This block really has so many possibilities! x Teje
ReplyDeleteI'm anxious to put mine together
ReplyDeleteI found 60 cut blocks at a thrift store and didn't know the pattern. This really helps!
Thank you so much! I recently bought the fabric to make a quilt from these blocks and was determined to find a tutorial- yours was the first I found and it answered all my questions!
ReplyDelete