First you need to establish how much binding you need.
Measure your quilt top to bottom and side to side.
Mine is 60" top to bottom, 46" side to side.
So, all round the quilt is 60 + 60 + 46 + 46 = 212"
You need to add 10 - 12" for joining seams and mitring the corners, so you need at least 222"
Fabric is usually 42" wide, so divide 222 by 42 and you get 5.28. You therefore have to cut 6 strips.
Each strip needs to be 2 1/2" wide.
You will have quite a lot left over, but as this is 2 1/2" wide (the width of a jelly roll strip) you can iron the left over piece flat and add it to your jelly roll stash!
Now, you need to join the 6 pieces.
With right sides together, place the end of one piece on top of a second piece and at right angles to it.
Machine stitch a diagonal line across the corner, securing the threads with a few reverse stitches at each end,

Trim the corner leaving a 1/4" seam allowance.
Press the seam allowance open.
Repeat for all the pieces until you have one long strip of binding. Press in half lengthways.
Starting at least 12" from one corner, pin the binding to the front edge of the quilt, along one side only.
Machine stitch, starting not at the beginning, but at least 6" along from the start of the binding strip. Use a walking foot and a 1/4" seam allowance.
Stop sewing 1/4" from the corner of the quilt. There is often a little indentation on the tip of the walking foot to show you where 1/4" is. Work a few reverse stitches to secure and remove the quilt from the machine.
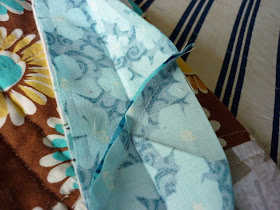
Fold the strip back at right angles to itself. You will have a diagonal fold line from the folded edge of the binding to the corner of the quilt.
Fold the binding strip directly back down, level with the second edge of the quilt, without disturbing the diagonal fold. Pin to secure.
Return your work to the sewing machine, and starting 1/4" from the top, continue attaching the binding along the second edge, pinning as necessary as you go.
Repeat the process for each corner of the quilt.
Stop sewing when you are about 10" from the start point. Secure with a few reverse stitches. Cut the threads and remove from the sewing machine.
Use your iron to press back the start of the binding with a diagonal fold.
Bring the tail end of the binding to meet that fold and crease it so that the two diagonal folds meet and butt against each other. Press in place.
Open the start of the binding out flat and pin the crease line to the crease line of the tail end (through one layer only so you can still open the tail end out flat)
Open the tail end of the binding out flat and pin the rest of the diagonal line so that you can see where to sew a diagonal seam just as you did when piecing the binding strip..
Sew along this pinned line (make sure you have pulled it well away from the rest of the quilt first!) and trim to leave a 1/4" seam allowance.
Press the seam allowance open.
Fold the now continuous binding strip back in half again.
Pin along the remaining edge of the quilt and sew in place from the point at which you left off to where you first started.
Hand stitch the folded edge of the binding to the back of the quilt. I like to use a thread with matches either the binding or the quilt back and use the machine stitching as a guide line.
When you come to the corners, one piece should fold neatly under the other. Just secure with a few extra stitches, again using the machine stitching as your guide line.
You are done!


Thank you. I always have trouble with bindings.
ReplyDeleteHave a Great Day,
Kathy